i400 - Flash NISSIN - Free user manual and instructions
Find the device manual for free i400 NISSIN in PDF.


User questions about i400 NISSIN
0 question about this device. Answer the ones you know or ask your own.
Ask a new question about this device
Download the instructions for your Flash in PDF format for free! Find your manual i400 - NISSIN and take your electronic device back in hand. On this page are published all the documents necessary for the use of your device. i400 by NISSIN.
USER MANUAL i400 NISSIN
natural_image
Technical line drawing of a Nissan Digital device casing (no text or symbols on the diagram itself)Thank you for purchasing a Nissin product
Before using this flash unit, please read this instruction manual and refer your camera owner's manual carefully to get a better understanding of the proper operation to enjoy flash photography.
Nissin i400 is designed for digital SLRs, with the latest TTL flash control system. Please note that i400 are not usable with other branded cameras for TTL operation.
SPECIAL FEATURES
The i400 features the use of a selector dial to quickly move through all settings.
Flash protection function:
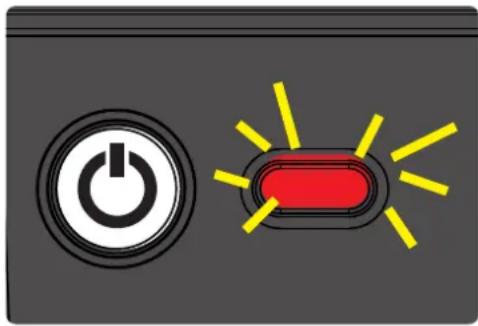
When the red LED lamp starts blinking, it means that flash is overheating.
The LED turns red when charging.
When the LED lamp turns green, the flash is charged and you can start to shoot.
natural_image
Illustration of a power button and a red toggle switch with yellow light rays (no text or symbols)Compatible cameras
Please refer Nissin's compatibility chart shown at its home page for details and recent updates: http://www.nissin-japan.com or http://www.nissindigital.com
SAFETY INSTRUCTIONS
These safety instructions refer to important information on how to use this product safely and properly. Please read the following instructions before using the product.

WARNING
This symbol refers to the possibility of personal injury, death or property damage if not followed as described.
● The flash unit contains high voltage electric parts. Do not try to open or repair the flash unit. Return it back to the repair service station or the store where you bought it from.
- Do not touch the inside parts from the opening when the unit was dropped or broken.
- Do not shoot the flash directly to the eyes at short distance. It may damage the eyes.
- When taking a flash picture, especially toward a baby, it is recommended to keep the flash unit at least 1 meter (3.3 feet) away from the subject. Or use diffuser or bounce the light to the ceiling or wall to soften its intensity.
- Do not place the flash unit near any flammable gas, chemicals or such liquids. It may cause fire or electric shock.
- Do not touch the flash unit with wet hands or use in the water. The flash unit carries high voltage inside and it may cause an electric shock.
- Do not shoot the flash unit directly at the driver of automobiles or such vehicles.
- Do not set the flash window close to the human body and shoot, which may get scalded.
- Place the batteries correctly in position. Placing the batteries in wrong polarity may cause leakage, exothermic heat or explosion.

CAUTIONS
This sign refers to conditions which may cause damage or defect.
- Do not leave or store the flash unit in the temperature over 40^ / 104^ , such as in the automobile.
● The flash unit is not water resistance. Keep the unit away from rain, snow and humidity. - Do not use benzene, thinner or other alcoholic agents to clean the unit.
- Do not use this flash unit with cameras which are not recommended in the compatibility list at official website, otherwise it may damage the camera's circuitry.
- Remove the batteries when not in use for a longer period of time.
- Do not have a heavy impact to the flash unit, nor throw it onto a hard surface floor.
Names of the Components
text_image
1 2 3 4 5 6 7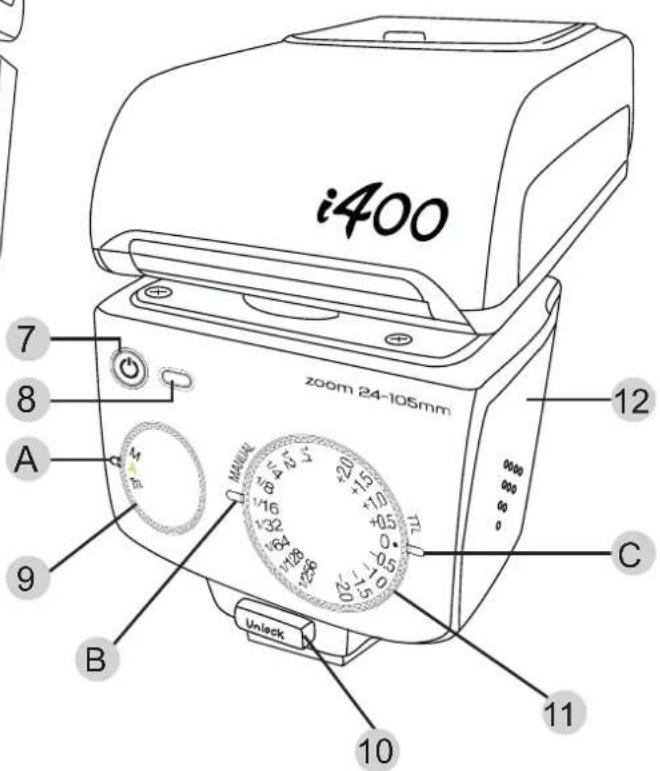
text_image
i400 zoom 24-105mm 7 8 A 9 B 10 11 12 C Unlock +20 +15 +10 +0.5 +0.5 +32 +32 +32 +32 +32 +32 +32 +32 +32 +32 +32 +32 +32 +32 +32 +32 +32 +32 +321 Fill-in reflector
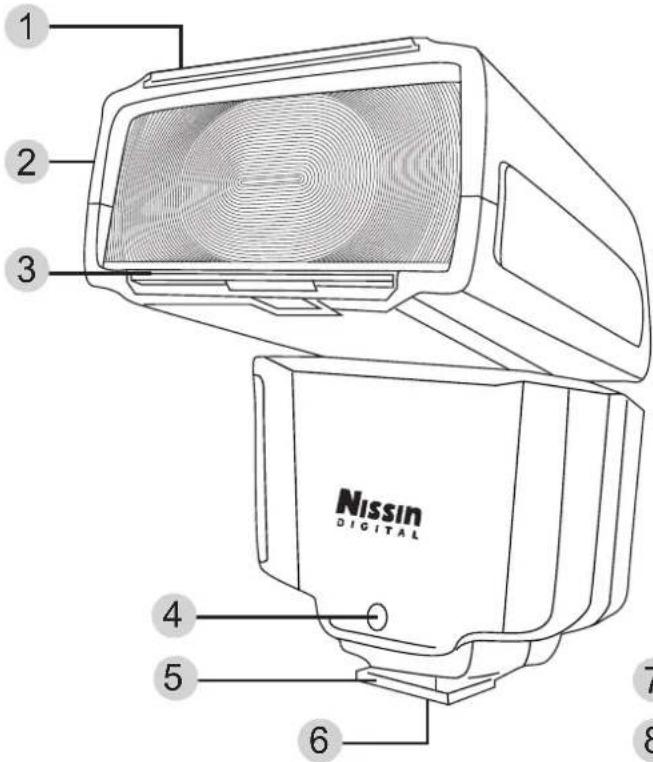
2 Flash head
3 Light diffusing panel
4 AF-assist light
5 Mounting foot
6 Hotshoe contacts
7 On/ Off switch
8 Pilot button (Test flash button)
9 Function dial
10 Release button
11 Power dial
12 Battery compartment door
A Indicator lamp A
B Indicator lamp B
C Indicator lamp C
Basic Operation
Inserting batteries
Usable batteries - Alkaline batteries, Lithium batteries or NiMH batteries.
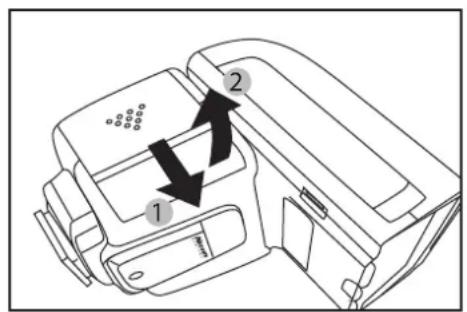
- Open the battery compartment door and insert 4 x size AA batteries as shown by the picture.
- Make sure the + and - battery contacts are correctly inserted at the battery compartment.
- Close the battery compartment door and slide it back in place.
When the recycle time becomes longer than 30 seconds, replace the batteries with fresh ones or recharge the batteries (rechargeable batteries).
text_image
Diagram of a printer with labeled parts and directional arrows indicating assembly or movement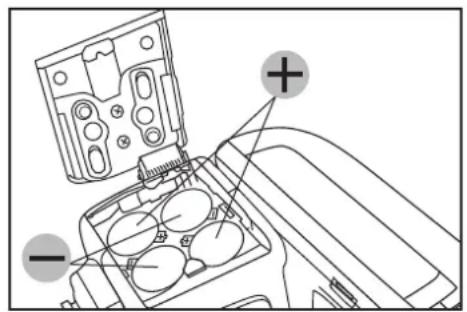
text_image
Diagram showing a device component with labeled parts and directional indicators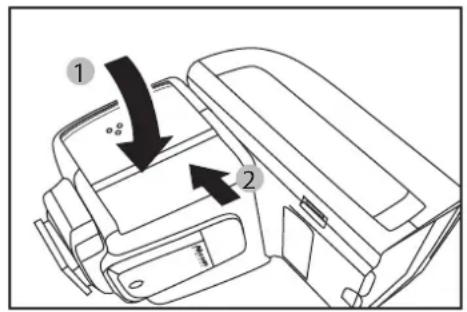
text_image
Diagram of a device interior with labeled parts and directional arrows indicating movement or flowNOTE
It is recommended to use all 4 batteries of the same brand and type, and replace them all at the same time.
Wrong insertion of each battery would not make electric contact.
Basic Operation
i400 has an energy saving power off function
To save battery energy, i400 automatically switches to stand-by mode, in A mode, TTL mode & Manual Power mode, in about 2 minutes of idle use.
While i400 is in the stand-by mode a Pilot button blinks every 2 seconds showing the flash unit is in stand-by mode. To turn on i400 again, press the camera's shutter button halfway or press any button of the flash unit.
In case i400 is not in use for over 60 minutes, the unit is completely turned off.
To turn on i400 again, take the first step of turning the flash unit on.
Protect overheating function
i400 is automatically turned off when repeating hi power full flash continuously over 20 to 30 times to protect the flash circuitry from overheating. It will automatically recover after 15 minutes of inactivity. The pilot button will blink in the red color every 1.5 seconds.
Mounting i400 on the camera
-
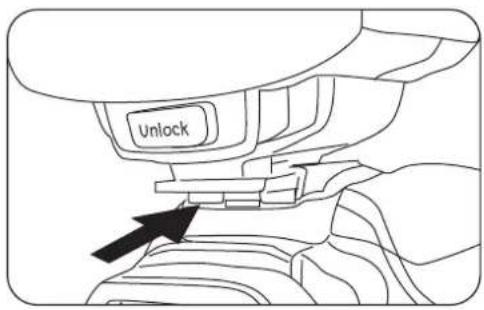
Slide the mounting foot of i400 into the hotshoe of the camera.
-
Make sure that thr mounting foot will lock (with a "click") when it has been inserted completely.
text_image
UnlockRemoving i400 from the camera
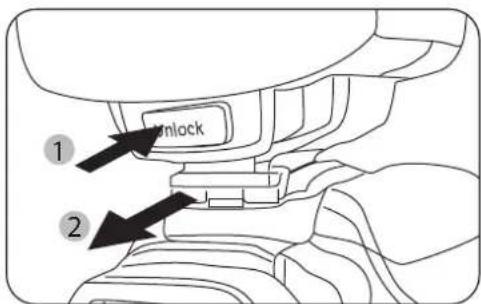
- Press the unlock button and slide the mounting foot of i400 off the hotshoe of the camera.
text_image
1 2 UnlockTurn on the flash unit
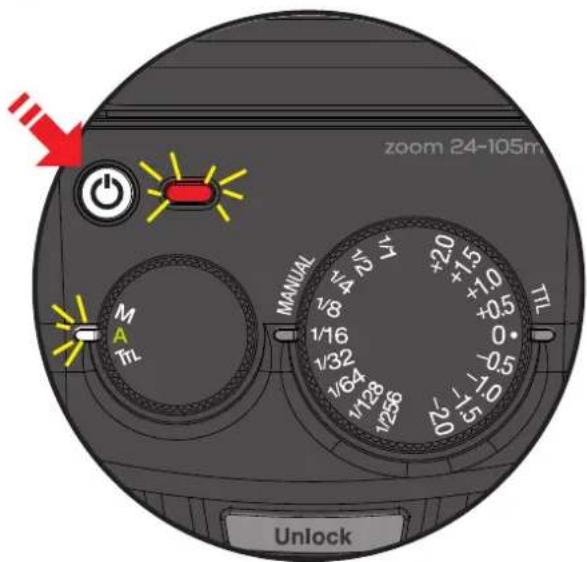
- Press the On/ Off switch and Pilot button turns red, showing the unit is turned on.
● Indicator Lamp A on. - In a few seconds, the Pilot button turns green. The i400 is ready to shoot.
● For a test flash, press the Pilot button.
● To turn off the flash unit manually, press the On/Off switch for 1 second.
text_image
zoom 24-105m M TIL MANUAL +2.0 +1.5 +1.0 +0.5 +0.0 -0.5 -1.0 -1.5 -2.0 1/8 1/16 1/32 1/64 1/128 1/268 1/5 UnlockMENU DIAL
i400 Flash Mode and Functions
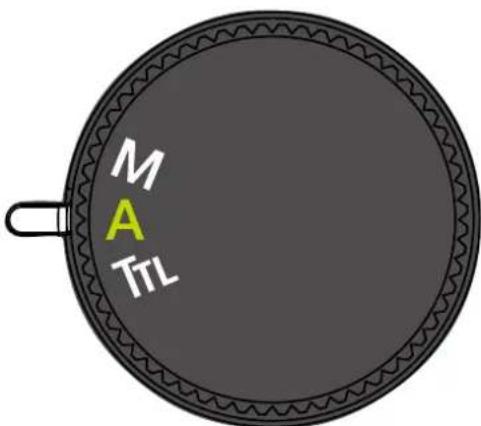
Rotate the dial to select a function.

... Full Automatic Mode
Flash light is fully controlled by the camera for the most proper exposure.

… TTL Program Mode
Flash light is automatically controlled by the camera but the flash exposure value can be compensated.

… Manual Setting Mode
Manual Mode -Selecting the desired manual power on the flash unit.
text_image
M A TTL
Shooting i400 automatically
Canon cameras
[P] (Program), [☐] (Full Auto), Av,
[Tv] (Shutter priority) or [M] (Manual);
Nikon cameras
In all of the camera's shooting modes listed above, i400 will fully work in TTL automatic-flash system.
- Set i400 to the camera's hotshoe and press the on/ off switch to power on.
● Indicator Lamp A on.
- Rotate the Function dial to "A" mode.
- i400 is now set for the camera's automatic flash control system.
- Press the shutter button of your camera halfway to focus the subject.
- Shutter speed, aperture and flash mark (⚡) are indicated in camera's view finder.
- Take the picture. i400 is fired and the result is immediately shown on the camera's LCD display.
- When you change the focal length, the power zoom flash head of i400 immediately sets its position to match the lens focal length you selected.
● The flash illumination coverage of i400 responds to the lens focal length of 24mm to 105mm (35mm film camera standard).
Set the camera's shooting mode, select focal length and take pictures with i400 on your camera.
i400 is a supplement to help you in taking a creative and live picture. Almost all tasks are automatically done by the camera and you just control the camera only.
| Mode | Shutter Speed | Aperture Setting | Control on the camera | |
| Canon | Nikon | |||
| [□] |  | Automatic | Automatic | Automatic |
| [P] |  | Automatic | Automatic | Automatic |
| [Tv] |  | Manual | Automatic | Any available shutter speed can be set |
| [Av] |  | Automatic | Manual | Any available f-stop can be set |
| [M] |  | Manual | Manual | Any available shutter speed / f-stop can be set |
TTL flash power compensation
With the latest TTL flash control system, the flash power level is always automatically controlled by the camera for the most appropriate exposure. If you wish, if you can soften or weaken the flash light, or give more light to the subject without changing the environmental or background exposure effect. The i400 can make it possible to quickly adjust the exposure for each particular flash picture as needed.
- Set i400 to the camera's hotshoe and press the on/ off switch to power on.
● Indicator Lamp A on.
- Rotate the Function dial to "TTL" mode.
- Indicator Lamp C on.
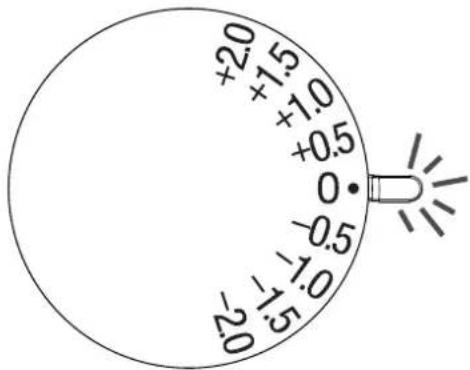
● To set the Flash power compensation level rotate the Power dial to the power level you desire.
- TTL flash power compensation is provided in 9 steps by half Ev increments for -2.0, -1.5, -1.0, -0.5, 0, +0.5, +1.0, +1.5 and +2.0 Ev.
● Take a picture and the subject is shown with required lighting effect by keeping the background exposure level as originally expected.
- On some cameras, the TTL flash power compensation setting is provided in its menu mode. When setting the TTL flash power compensation on your camera, any compensation which is also set on the i400 will be counted in addition to the compensation you selected in the camera's menu mode. (i.e. Having a +1 compensation set on the flash and a +1.3 compensation set in the camera would yield a total compensation of +2.3 EV.)
text_image
+2.0 +1.5 +1.0 +0.5 0 -0.5 -1.0 -1.5 2.0
Manual Exposure Flash
In some occasions, or for special expression, you may need your own flash exposure instead of the automatic controlled exposure. You can set i400 for non-automatic flash mode, and select the desired flash power from 9 different levels
- Set i400 to the camera's hotshoe and press the on/ off switch to power on.
● Indicator Lamp A on.
- Rotate the Function dial to "M" mode.
● Indicator Lamp B on.
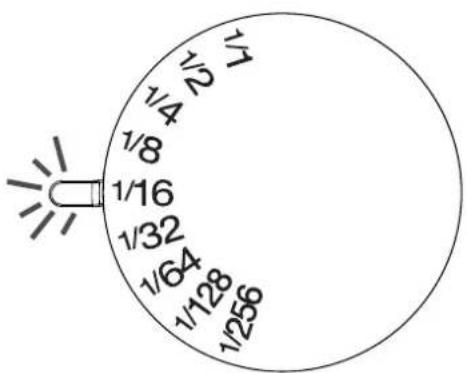
- You can select the power by rotating the Power dial: 1/256 - 1/128 - 1/64 - 1/32 - 1/16 - 1/8 - 1/4 - 1/2 - 1/1 (Full) power.
- Set the camera shooting mode to either AV, A or [M].
- Select your desired F--stop and / or shutter speed. Point at the subject and press the shutter.
text_image
1/1 1/4 75 11 1/8 1/16 1/32 1/64 1/128 1/256High-Speed Sync
- i400 supports shutter speeds up to 1/8,000 second.
● Indicator Lamp A on.
● High-speed Sync: In A, M, TTL, Wireless mode
● Enable HSS (Canon)/ Auto FP (Nikon) function on camera body. - For set up details please refer to Camera operation Manual.
Fill-in flash and Light diffusing panel and Soft box
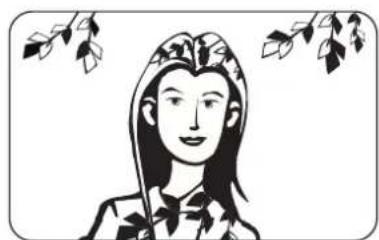
For short distance or portrait flash photography, if the light is not too sharp or too strong to the subject, use the fill-in reflector flash or optional soft light box.
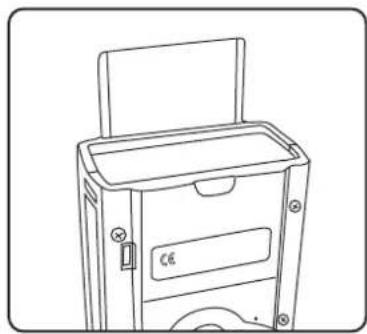
- If the subject is close (within 2 meters), turn the flash head 90^ upward and pull out the fill-in reflector as shown in the picture.
● Take a picture as usual. A blink of fill-in flash freshens up the subject in natural image.
● This small blink of flash is also useful when taking a picture of a baby without scaring him.
● This technology is also useful to eliminate the shadow on the subject under the tree.
natural_image
Illustration of a person with long hair and traditional attire, framed by leafy branches (no text or symbols)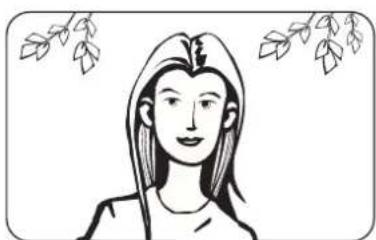
natural_image
Illustration of a person with long hair and leafy top, framed by leafy branches (no text or symbols)- For portrait photography, pull out the light diffusing panel and place it over the flash window as shown in the picture. The diffusing panel makes the flash light softer.
● Since the light diffusing panel expands the lighting area, it covers the range of 16mm focal length lens.
natural_image
Line drawing of a mechanical device with a lid and base plate (no text or symbols)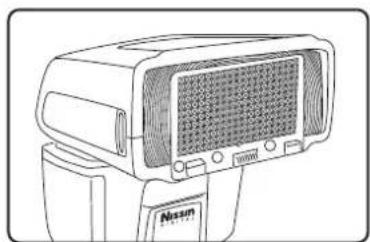
natural_image
Line drawing of a Nissan electric fan with grille and control panel (no text or symbols)Bounce lighting
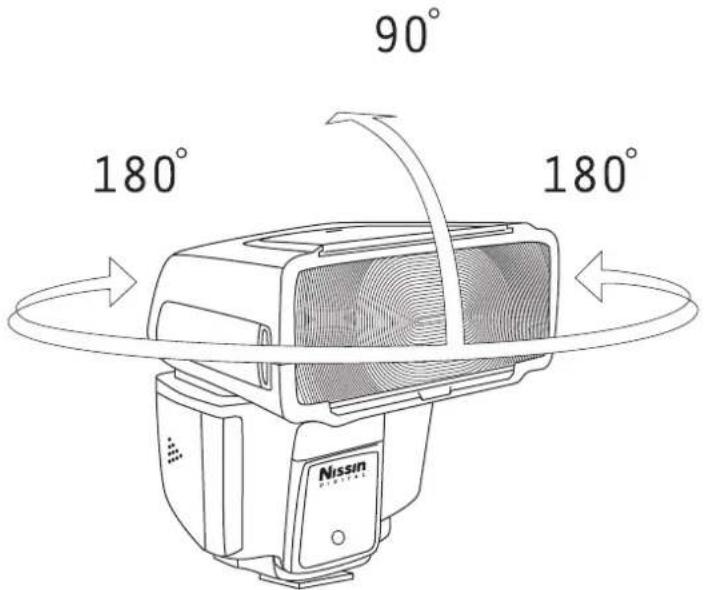
When lighting a subject in front of the wall, an unnecessary sharp shadow may appear on the wall behind the subject resulting in a disappointing picture. Bounce the light off the ceiling or wall to soften the light on the subject, and the shadow will fade.
text_image
90° 180° 180° Nissin● The flash head turns upward to 45^ >60^ >75^ >90^ .
● The flash head pans to both sides left and right in steps of 30^ , 60^ , 90^ , 120^ , 150^ , 180^ or to right 30^ , 60^ , 90^ , 120^ , 150^ , 180^ .
- Or mixing it upward/ sideways, you can set it in multiple directions as shown.
- When the flash head stays at turning or tilting position, the zoom setting position of i400 is automatically set at the position for a 50mm focal length lens.
● The wall or ceiling in this case should be a flat surface and white color is preferable. Colored ceiling or wall may reflect its color on the subject.
AF assist light emitter
Under a low light condition, or in a dark place, the AF assist light will automatically emit the beam and illuminate the subject, so that the camera can easily focus on the subject in darkness. The beam is however not shown in the picture.
Flash Power Lock
When the back ground of the main subject is too bright, the camera's exposure reading system adjusts the flash light intensity for such back ground condition and it results in the main subject being underexposed. Or in case the main subject is not placed in the center of the viewfinder, the flash picture may result in the aimed targeted subject being under or over exposed. You can lock the correct flash exposure for the targeted subject in such a condition. This flash exposure pre-set remains locked in, even if you change the aperture or zoom the lens in and out. This mode can only be set on the camera.
With Canon cameras: FE lock
- Focus the subject.
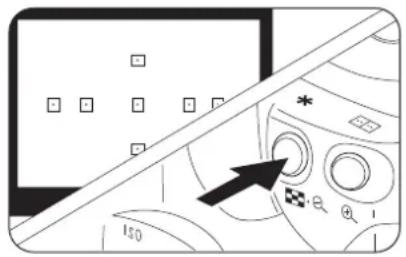
- Aim the viewfinder center over the main subject and press [×] button on the camera (or [ FEL ] button on some cameras).
- Pre-flash is fired to pre-set the correct light amount for the main subject.
Remarks: FEL only works on P, TV, AV, M & A-Dep mode.
text_image
Diagram showing camera mode dial with an arrow pointing to the mode, labeled with symbols and numbers.(It depends on different type of camera, please check your camera instruction manual.)
With Nikon cameras: Fv lock
- Set the Fv lock mode at the menu on your camera.
- Focus the subject.
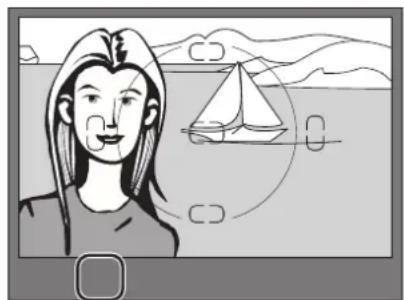
- Aim the viewfinder center over the main subject and press [AE-L] button on the camera (or [AF-L] button on some cameras).
- Set the picture frame as you desire and release the shutter.
natural_image
Illustration of a person with a sailboat on water, no text or symbols present(It depends on different type of camera, please check your camera instruction manual.)
For Nikon Version only
Following functions are available on Nikon cameras. Refer to camera owner's manual for details.
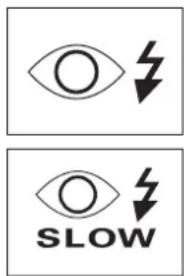
Slow shutter synchronization
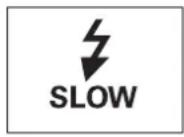
The flash is controlled at a slow shutter speed to the correct exposure for both the main subject and back ground in low light conditions or at night.
Red-eye reduction
To prevent the subject's eyes from appearing red, i400 fires three controlled flashes just before the picture is taken. Red-eye reduction can be combined with slow sync.
Rear curtain synchronization
In rear-curtain sync., the flash fires just before the rear curtain closes. By using this function at slow shutter speeds, a moving subject will appear with such moving marks behind.
text_image
SLOW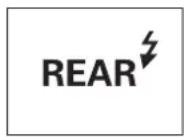
Specifications
| Type | Canon, Nikon, Sony, Fujifilm, Four Third system |
| Guide no. (at ISO 100 in m) | GN40 (at 105mm zoom head position)GN27 (at 35mm zoom head position) |
| Focal length coverage | 24 - 105mm (16mm when using built-in wide panel) |
| Power Source | Four size- AA batteries |
| Battery storage | Directly insert into the body |
| Recycling Time | 0.1 - 4sec |
| Number of flashes (Approx.) | 220 - 1,700 flashes |
| Flash duration | 1/800 - 1/20,000 Sec |
| Color Temperature | 5,600k |
| Exposure control | TTL |
| EV compensation on flash | -2 to +2 EV in increments of 1/2 EV |
| Bounce position | Up: 0-90°, Down: 0°, Left: 180°, Right 180° |
| Flash exposure control | 1st & 2nd Curtain synchronization, High-speed synchronization, Red-eye reduction, Slow synchronization (depends on camera),FE / FV Lock (set on camera) |
| AF-assist beam effective range | 0.7 – 5m |
| Operation panel | 2 Selector dials, power button, pilot button |
| Manual mode power ratio | 1/256 - 1/1 |
| High speed sync | Yes (up to 1/8,000s) |
| Dimensions | 85(H) x 61(W) x 85(D) mm/ 3.35(H)x2.4(W)x3.35(D)inch |
| Weight | 203g/ 7.16oz (without batteries) |
Guide Number table
Guide No. at manual exposure mode (ISO 100 in meters)
| Zooming Position | Flash Power Level | ||||||||
| Full 1/2 | 1/4 1/8 | 1/16 1/32 | 1/64 1/128 | 1/256 | |||||
| 24mm | 22 16 | 11 8 6 4 | 3 | 2 | 1 | ||||
| 28mm | 25 | 18 13 | 9 6 4 | 3 | 2 | 2 | |||
| 35mm | 27 19 | 14 10 7 5 | 3 | 2 | 2 | ||||
| 50mm | 32 23 | 16 11 8 6 | 4 | 3 | 2 | ||||
| 70mm | 36 25 | 18 13 9 6 | 5 | 3 | 2 | ||||
| 85mm | 38 27 | 19 13 10 7 | 5 | 3 | 2 | ||||
| 105mm | 40 28 | 20 14 10 7 | 5 | 4 | 2 | ||||
Trouble Shooting
The flash unit does not start charging.
- Batteries are not correctly installed >>> Install batteries to correct direction.
- Batteries are exhausted
Replace the batteries if the recycle time is beyond 30 seconds.
The flash unit does not fire.
- The flash unit is not firmly clipped on the camera >>> Mount the flash unit firmly on the camera's hot shoe.
- The flash unit is automatically powered off >>> Turn on the switch again.
The flash picture is overexposed or underexposed.
- A reflective object or strong lighting is near the subject >>> Use FE or Fv lock.
- The unit is set for manual exposure mode >>> Set to TTL mode or other power level.
Warranty
In case of the following reason of the defect, it may void the warranty. Please refer the respective warranty condition for details which depends on the country of purchase.
- The product is not used in accordance with the instruction of the owner's manual.
- The product is repaired or modified by the one who is not an authorized repair service.
- When the product is used with the cameras not applicable, lens, adaptors or such accessories produced by the third party.
- Fault or defect caused by fire, earthquake, flood, public pollution and such natural accident.
- In case that the product is stored in dust, moisture, extremely high temperature or such poor condition.
- Scratch, blemish, crush or worn out by a violent use or treatment.
- Guarantee card without name of place purchased or date of purchase stamped, or no guarantee card.
Nissin
Nissin Japan Ltd., Tokyo
http://www.nissin-japan.com
Nissin Marketing Ltd., Hong Kong
http://www.nissindigital.com